This tutorial provides an overview of setting up a single machine base ArcGIS Enterprise deployment. This configuration is commonly used for testing and prototyping purposes. It enables self-service mapping and can be used with ArcGIS Pro, ArcMap, and other client applications. Although you can use this configuration in a production system, your performance, system architecture, and other requirements will dictate the deployment pattern your production deployment follows.
The resulting deployment will include the following:
- An ArcGIS Server machine licensed as ArcGIS GIS Server and used as a hosting server
- Portal for ArcGIS
- ArcGIS Data Store configured as a relational and tile cache data stores
- Two ArcGIS Web Adaptor web adaptors
Note:
The process of installing and configuring an ArcGIS Enterprise base deployment can be done manually or automatically with the use of the ArcGIS Enterprise Builder. This topic describes the process for manually installing and configuring the components. To install and configure components automatically using a wizard, see an overview of the ArcGIS Enterprise Builder.
Prerequisites
To create a base ArcGIS Enterprise deployment, you'll need the following:
- Setups for ArcGIS Server, Portal for ArcGIS, ArcGIS Data Store, and ArcGIS Web Adaptor.
- License files for authorizing your software. This will include an authorization file for ArcGIS Server and a .json file for authorizing portal members and apps.
- Ensure that port 80 is enabled for HTTP communication.
- A trusted certificate for enabling HTTPS.
- Sufficient disk space and memory. To install the components listed above on a single machine, it is recommended that the machine have a minimum of 16GB of RAM and at least 20GB of disk space available. You can see the full system requirements for each component in its installation guide.
- A .zip file containing a shapefile with fewer than 1000 features.
Once you have these prerequisites in place, follow the steps below to set up your deployment:
- Install Portal for ArcGIS. See the Portal for ArcGIS installation guide for more information.
- Choose to create a new portal.
- Select a license file to authorize your portal's user types and apps.
This file is obtained from My Esri, and its format is .json.
- Create the initial administrator account.
- Specify the content directory for the portal.
You'll be prompted to install ArcGIS Web Adaptor. Before you do this, you must enable HTTPS on your web server.
- Install the ArcGIS Web Adaptor. Since this prototype setup will include two web adaptors, name this one portal. Configure the web adaptor with your portal using the initial administrator account. See About the ArcGIS Web Adaptor for more information on installation and configuration.
- Install and authorize ArcGIS Server. Ensure that you license the server as ArcGIS GIS Server.
The ArcGIS Server installation guide contains detailed information about the software installation process.
- Create your site and remember your primary site administrator account user name and password. See Creating a new site in the ArcGIS Server documentation for more information about this process.
- Install a second ArcGIS Web Adaptor named server and configure the web adaptor with your ArcGIS Server. Use HTTPS for the URL you provide when registering the web adaptor.
You do not need to enable administrative access.
- Install ArcGIS Data Store and create a relational data store and tile cache data store to be used with your ArcGIS Server site. See the ArcGIS Data Store help for more information.
- Log in to the portal using your initial administrator account.
- Browse to Organization > Settings > Servers page.
- Click Add Server and provide a service URL.
This URL is where your GIS services is accessed. This is through the web adaptor named server. For Administration URL, add the URL that the portal will use to communicate with the server. This should have 6443 in the URL. Then provide the user name and password for the primary site administrator or any ArcGIS Server administrator.
- Set your newly added server as the portal's hosting server and click Save.
- To test whether your deployment is working properly, add your zipped shapefile to the portal. Browse to Map Viewer by clicking Map. Click Add > Add Layer from File and browse to the location of the .zip file. Click Import Layer, and the shapefile contents should appear on the map.
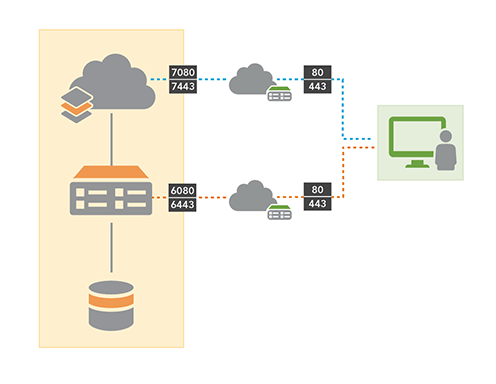
The diagram below illustrates the base ArcGIS Enterprise deployment you've created.

You can access different parts of your deployment using the URLs below.
| Location | URL format | Example URL |
|---|---|---|
Your portal | https://portal_webadaptorhost.domain.com/portal_webadaptorname/home | https://ansible.hynes.com/portal/home |
| https://portal_webadaptorhost.domain.com/portal_webadaptorname/portaladmin | https://ansible.hynes.com/portal/portaladmin | |
ArcGIS Server Manager | https://gisserverhost.domain.com:6443/arcgis/manager | https://picard.hynes.com:6443/arcgis/manager |
You can further configure the portal, including security, membership, groups, and utility services by following the instructions in the Portal Administrator Guide.